
The Easter weekend is approaching, and with it the perfect opportunity to try something new. For those who want to use the days off not only to relax, but also for creative and technical activities, there is an exciting range of possibilities. Our DIY guide is aimed at anyone who wants to use the Easter weekend to discover new skills or improve existing ones. Whether you’re a tech enthusiast or new to the field, the coming days offer the perfect opportunity to make time for projects that foster both creativity and technical understanding. And who doesn’t like an excuse to enjoy fun crafts and technical gadgets in equal measure? So, get your screws sorted and soldering irons preheated – all the tech projects for the Easter weekend can begin!
Glowing eggs: your sparkling DIY Easter LED project for Easter
Easter is just around the corner, and what could be cooler than combining traditional egg decorations with technical gadgets? With this project, you can design your own LED eggs to decorate your home and garden. And you’ll also gain some basic experience in electronics and circuits along the way. All you need is a few empty eggshells (ideally ones that are still whole), LEDs, button cell batteries, some conductive material such as aluminum foil or conductive glue and, of course, your own creativity.
- Start by carefully emptying and cleaning the eggshells. A small hole at the bottom is all you need to extract the yolk and egg white and insert the LED later.
- Grab LEDs in the desired colors, or use white LEDs with the highest possible light output. In this case, you can also use colored eggshells or paint them as you wish. However, make sure that the paint is as translucent as possible.
- Then place the button cell battery between two pieces of aluminum foil and connect the ends of the LED connection cables to the foil. Make sure the polarity is correct. The longer leg of the LED usually belongs to the positive pole of the battery.
- Then carefully push the LED into the eggshell. You can fix the circuit with a little adhesive tape so that everything stays where it should.
Alternatively, you can of course also use a ready-made LED light chain from the DIY store for this project and attach several eggs at once. In this case, however, the technical part is eliminated.
Easter geocaching with GPS
An Easter geocaching adventure is fun for the whole family and can be an exciting way to enhance the traditional Easter egg hunt with modern technology and the flair of DIY Easter. With a smartphone and the c:geo geocaching app, you can hide your own Easter caches in the garden, park or nearby and then go on a digital (and analog-chocolatey) treasure hunt.
- First of all, you have to place small surprises such as chocolate eggs, toys or similar items in lockable containers. Then choose several suitable hiding places for these caches and enter them in the app.
- Open the c:geo app on your Android smartphone and enter a name and the exact GPS coordinates of the location under “New cache”. You can conveniently select the latter by tapping and holding on the map in the app.
- The “Other” category is recommended as the cache type. But don’t stop there, you don’t want to make the search too easy. Spice up the action by entering tricky puzzles or instructions for the search in the hint field, for example. Confirm each cache with “Execute” to create it in the app.
- Once you have entered all the planned hiding places, you can start the exciting search. To do this, switch to the “Live map” in the app – the caches you have created are shown here as target markers.
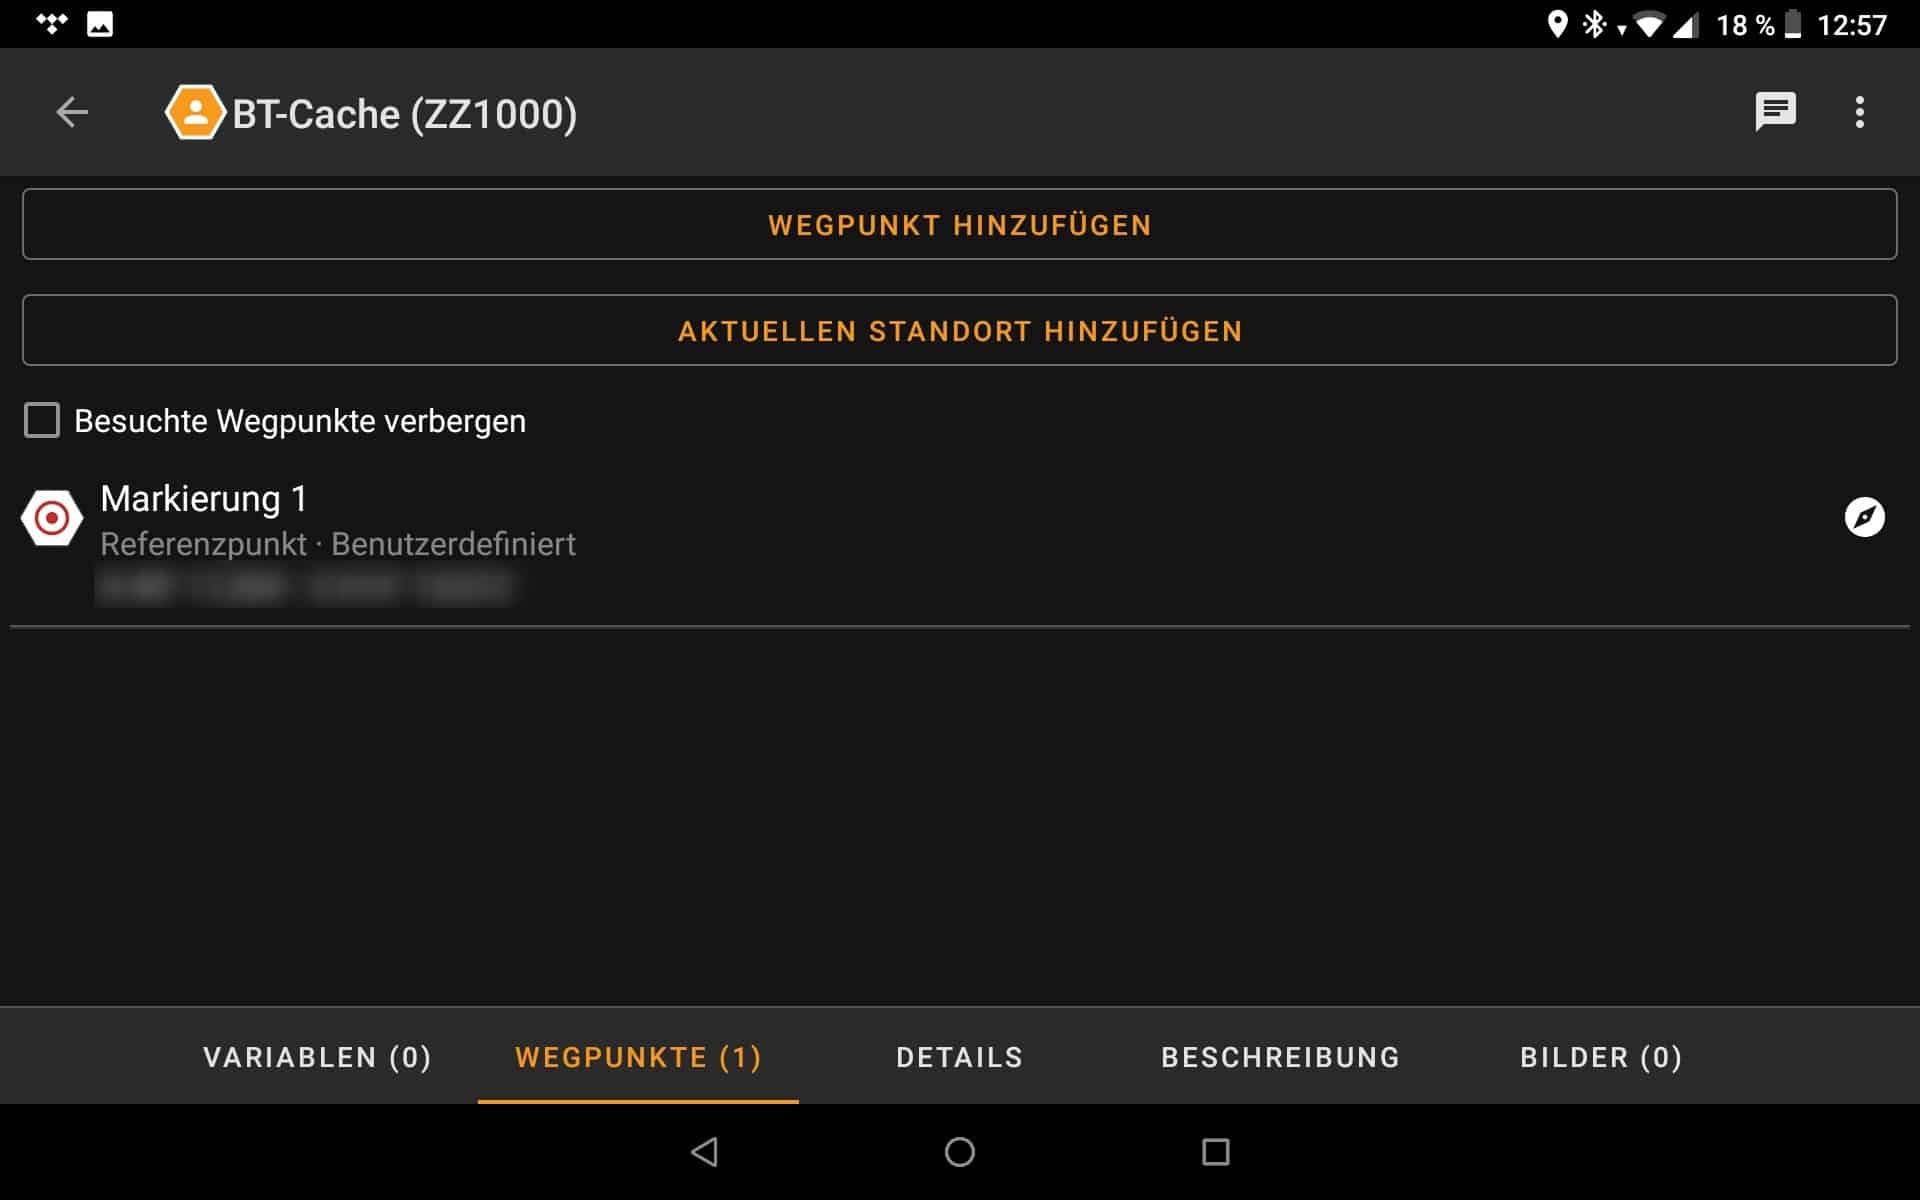 The c:geo app on Android looks a little complicated and overloaded at first glance, but thanks to the tutorial at the beginning it is easy to understand and largely self-explanatory
The app now guides you directly to the individual hiding places with a practical distance display. Once you have arrived at your destination, you have to search for the cache and the surprise it contains. You can then mark each hiding place you find as “Found” in the app. For extra fun, you can share the route with your family in advance in the c:geo app. Expand the search route next year with new tricky hiding places to challenge each other.
DIY Easter: 3D-printed Easter eggs
In the world of DIY Easter projects, 3D printing opens up completely new possibilities for expressing your creativity at Easter time. Instead of painstakingly and meticulously painting the eggs by hand, as a tech-savvy owner of a 3D printer, you can also create your own complex Easter egg designs on the computer and then bring them to life using 3D printing. The possibilities here are almost limitless, as long as the material and printer play along: from intricate geometric patterns to detailed images of the Easter bunny, anything is usually possible.
-
- Start by selecting or designing a 3D model that suits Easter (or your imagination). You can find plenty of free models on platforms such as Thingiverse or MyMiniFactory.
-
- Adjust the model as required in 3D printing software to change the size or prepare and optimize it for printing.
-
- In the next step, choose a suitable filament for your print. For Easter eggs, bright or pastel-colored filaments are ideal to emphasize the festive mood of the beginning of spring.
-
- After printing, you can finish the eggs as you wish – be it by painting them, attaching additional decorations or using LEDs to make your creations stand out.
Design your own Easter eggs for 3D printing
The slightly more advanced option in terms of DIY Easter is to design your own individual Easter egg (or something completely different). All you need is Blender, an app that is available to download for free, and a little patience. Install the software, open Blender and start a new project.
To design an Easter egg in Blender and then prepare it for 3D printing, start by creating a UV sphere, which will form the basis of your egg design. First remove the standard cube from the scene and then add the UV sphere. In the next step, adjust the shape of the sphere to give it the typical egg shape. You can do this by switching to edit mode and dragging the top vertex upwards while you have the proportional editing mode activated to achieve a natural egg curve. If you want to make more extensive changes, you can also switch to Sculpt mode and shape the egg to your liking.
Once you have completed the basic shape of your egg, you should check the model for printability. Make sure that the volume is solid and does not contain any superfluous internal geometries that could interfere with the printing process.
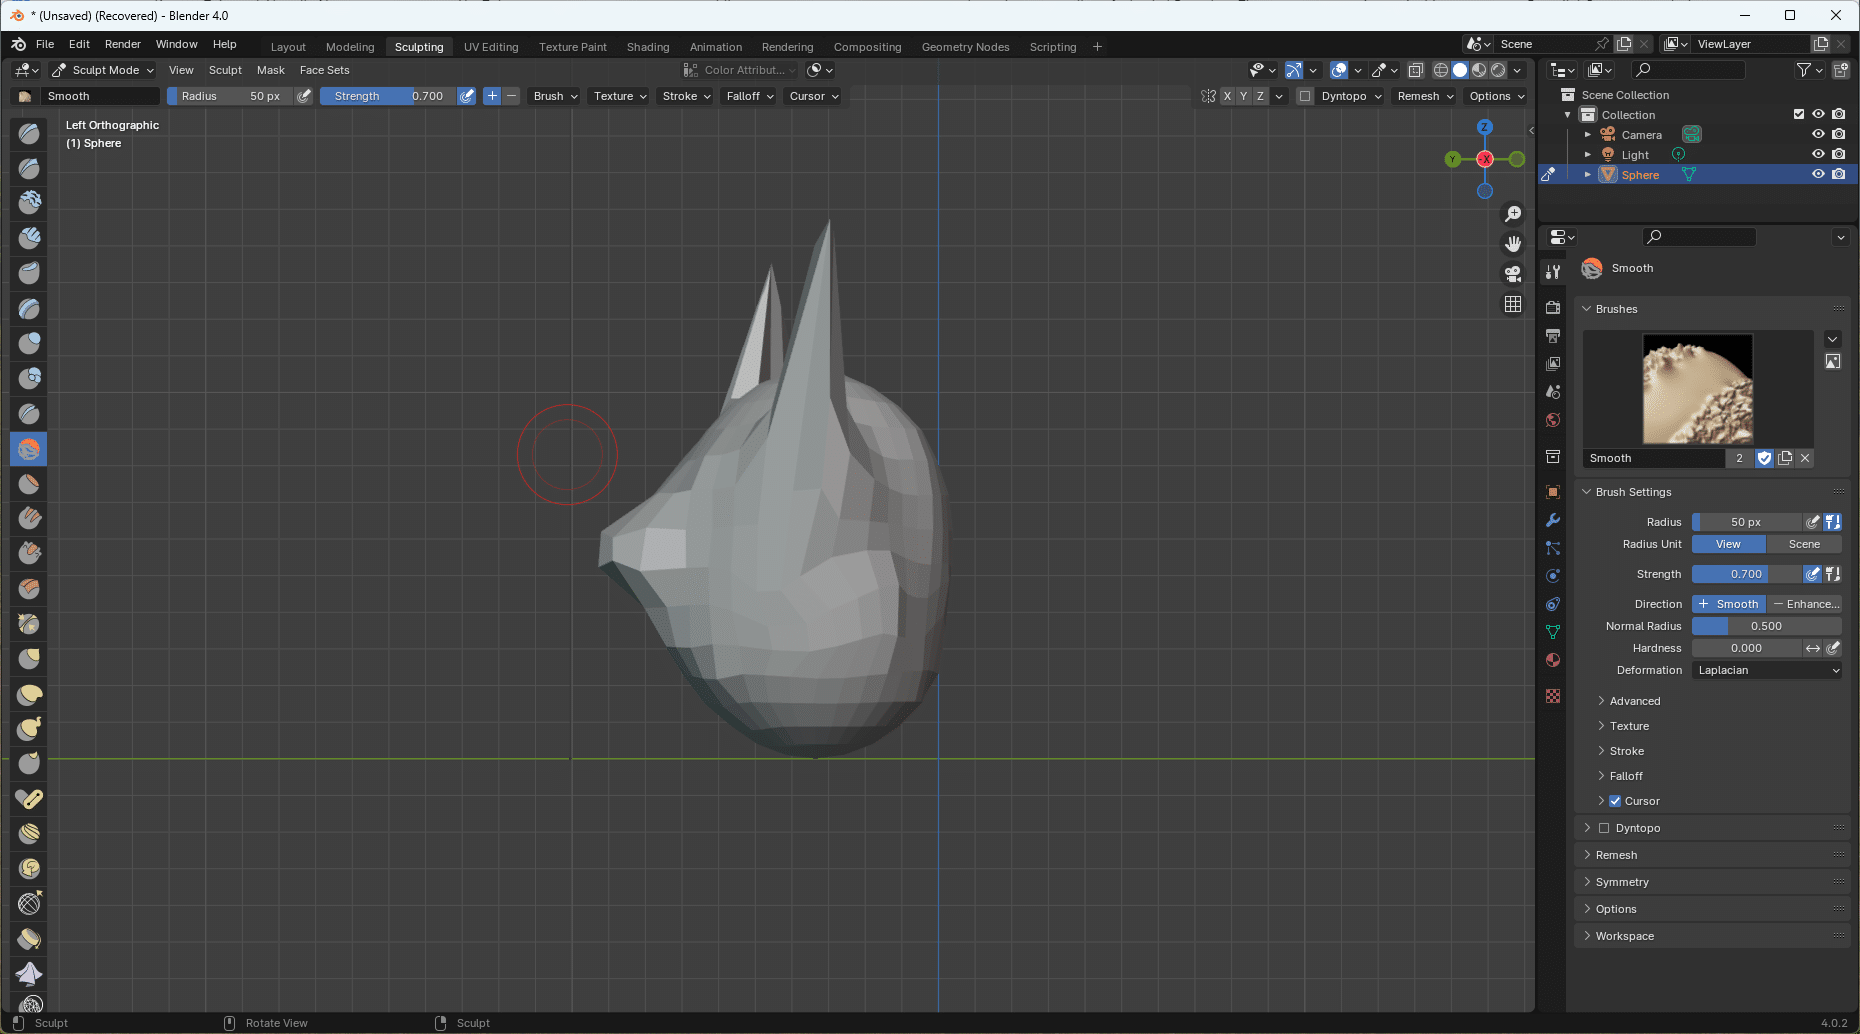 Blender is a multifunctional modeling and rendering tool that you can also use to design Easter eggs and other decorations in an artistic way. Admittedly, the picture shows that our Blender skills are a little rusty
Then export your project as an STL file and import it into your 3D printing software. You can then make any final adjustments and add support structures if necessary. You can also set the infill density and print speed and then start printing.
Easter eggs with QR codes
An innovative twist on the traditional Easter egg hunt and a perfect opportunity for your DIY Easter is the use of QR codes. Simply attach codes generated by you to the Easter eggs and turn each egg into a digital surprise. This can range from simple Easter messages and puzzles to digital gifts – after all, you can wrap any link in a QR code.
- Generate the desired QR codes using an online tool. Each code should lead to a specific URL where the participants of the egg hunt can find a message, task or digital gift.
- Ideally, print out the QR codes on self-adhesive labels and carefully attach them to the eggs. Alternatively, you can also use transparent adhesive film that is suitable for your printer. Or choose the Pro version and use transfer foil to apply your codes to the shell like a tattoo.
- Hide the eggs as usual. Participants can scan the codes with their smartphones to discover the digital content.
- Be creative when designing the digital content – perhaps a riddle will lead to the next hiding place or a loving greeting is waiting to be discovered.
With this type of egg hunt, you combine the joy of discovery with the playful use of technology and turn Easter into an interactive experience that will be remembered for a long time to come.
Discarded smartphones as digital picture frames
Who doesn’t know the situation: Somewhere in a box, in the depths of the basement or attic, there are still several old smartphones waiting for better times, or until you finally recycle them. These devices can also be upcycled, as long as they still work to some extent – and provide the perfect canvas for bringing digital Easter joy (or other pictures) into your home. As a digital picture frame, you can give your old smartphones a second life and save money at the same time with this upcycling idea.
The process is less complicated than you might think. Start by resetting your old smartphone to factory settings and deleting all personal data. Then log in to the Play Store again and download the Fotoo app. Alternatively, one of the other numerous photo frame apps will of course also work.
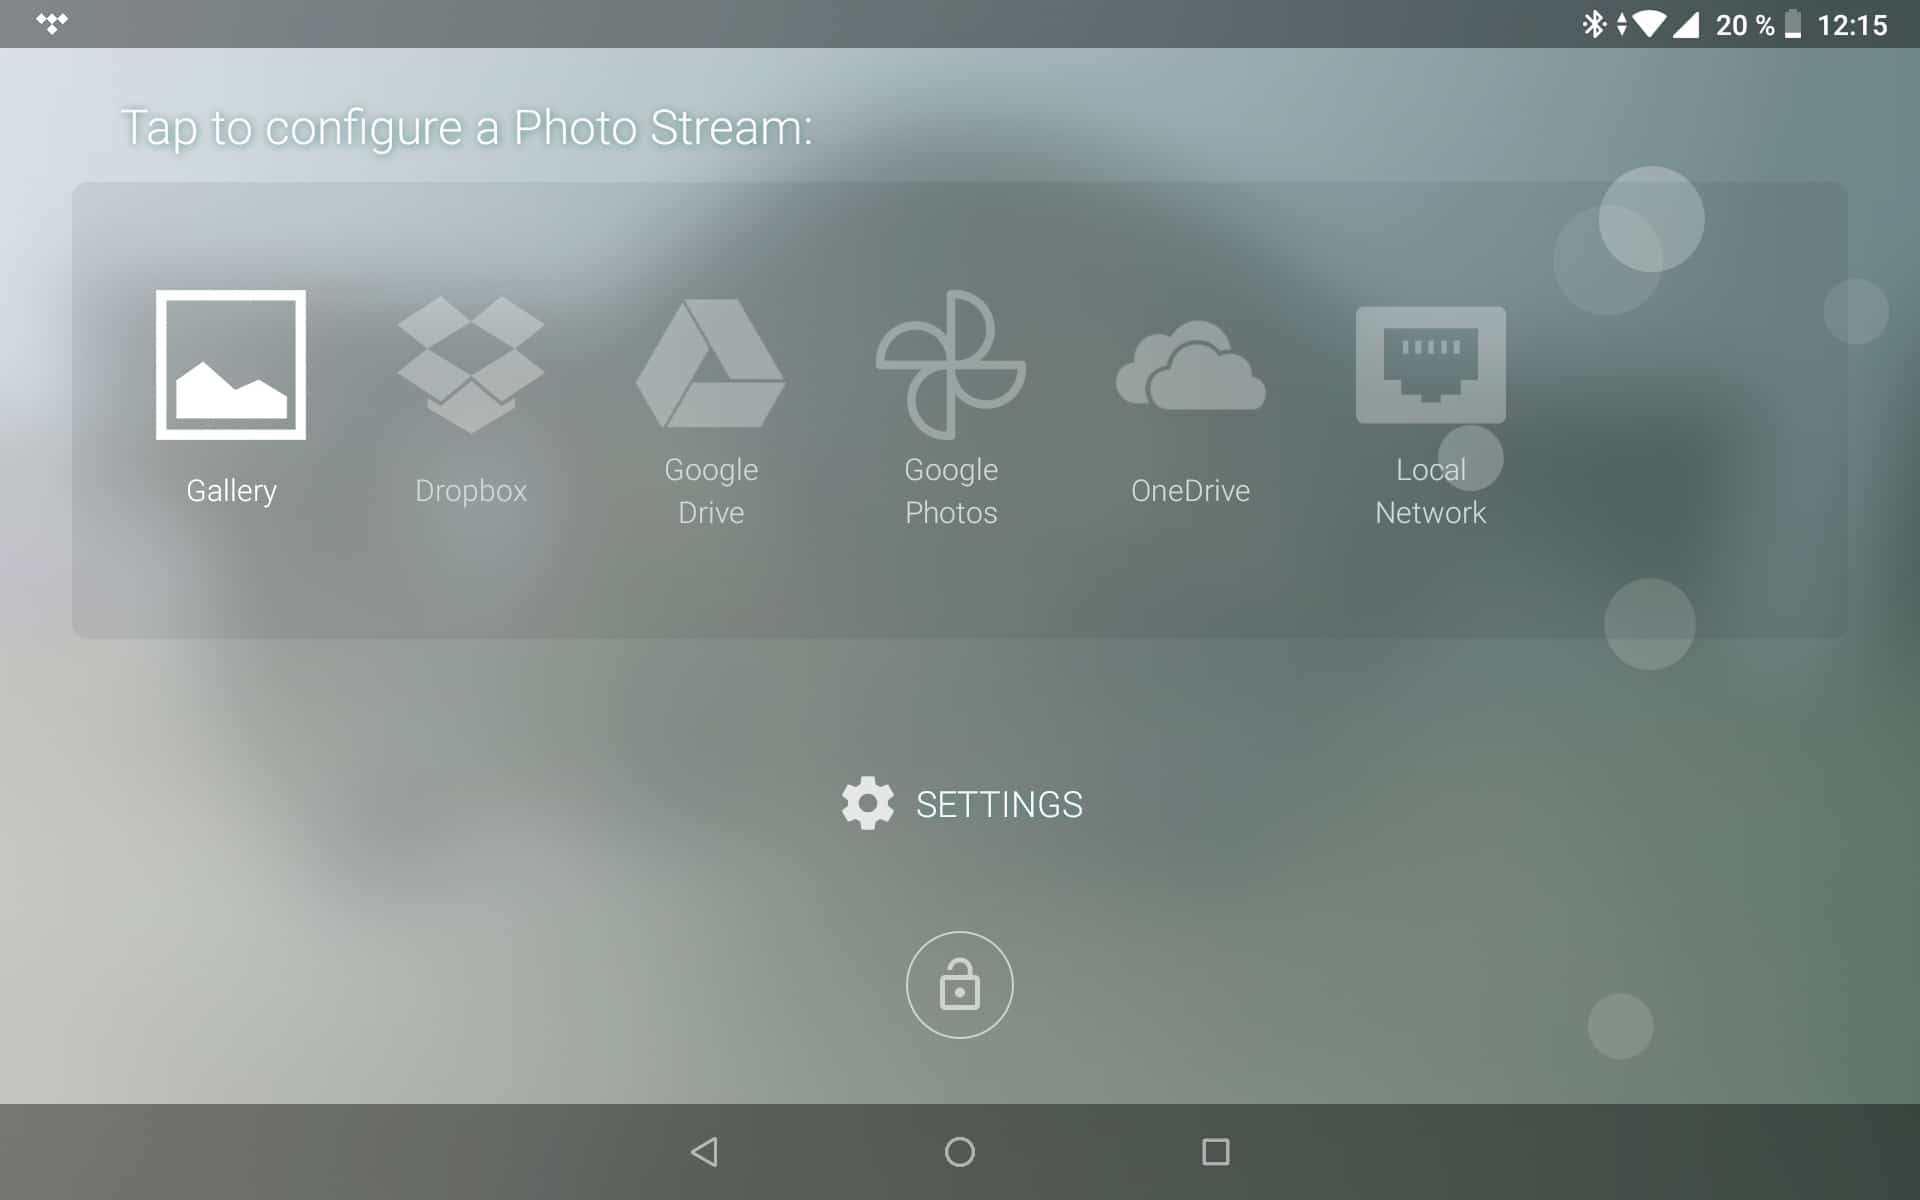 Anyone can buy a digital picture frame. But there is also a more resource-saving way – namely with an upcycled smartphone, which you can give a fulfilling task again
Your next step is to collect and organize your favourite photos. These can be personal souvenir photos, downloaded Easter motifs or digital works of art, whether on your local smartphone or from your Google Cloud. The app offers you the simple option of presenting these images in an appealing slideshow. The setup itself is child’s play: place your smartphone in a frame or stand to make it look like a real picture frame and then adjust the app’s settings to customize the slideshow to your liking.
DIY Easter: Upcycling Easter wreath with old cables
How about an Easter wreath that not only attracts attention, but also makes a charming statement about upcycling? Grab your old USB and VGA cables – yes, the ones that have been lying unused in a drawer for years and aren’t exactly ageing gracefully.
The first step is to collect cables! USB, VGA, maybe a few old charging cables – the more colorful, the better. These technical relics from days gone by are not only beautifully flexible, but also come in a range of colors and textures that are sure to make your new wreath a real eye-catcher. It’s best to cut off all the plugs so that they don’t get in the way when weaving. Next comes the more difficult part. Braid the cables together and form a basic circular shape first. Next, wrap more cables around it and twist them slightly so that the shape remains as intact as possible.
Once you have completed the basic structure, you can fix the cables with cable ties if necessary. However, make sure that the cable ties are not too conspicuous and ideally use some in the same color as your cables. If you like, you can weave a colorful string of lights around the wreath as a final finish so that it is guaranteed to attract everyone’s attention.
Of course, you are free to decorate your work even further, as discarded hardware is usually easy to organize. However, always make sure that all individual parts are firmly attached and do not come loose. Do you happen to have 4 round CPU heat sinks lying around? Then you can also use your work of art during Advent.