Balcony power plants are the trend. In the face of rising electricity prices and a growing awareness of the many problems associated with fossil fuels, more and more people are opting to generate clean electricity themselves. Mini PV systems are considered particularly suitable for this purpose: They merely need to be screwed together and plugged in, and you’re ready to start generating electricity. Since the beginning of the year, the state has also been providing enormous incentives: balcony power plants are exempt from sales tax and can be purchased at a correspondingly low price.
Nevertheless, there are some things to consider if your own mini solar power plant is to be a success. For example, there are some legal requirements that must be met in order to be able to legally put the power plant into operation. Particularly relevant here is the limitation of the power to 600 watts. If this value is exceeded, numerous simplification regulations no longer apply, which would ultimately make the operation unprofitable. However, an EU regulation is expected to soon allow 800 watts as a balcony power plant. In addition, there is an obligation to register with both the Federal Network Agency and the local network operator. Whoever disregards these must expect heavy fines.
The Chinese company Anker has created Solix, a new brand with which it is entering the solar market described. We were given the opportunity to test the Solix RS40P plug-in balcony power plant. This product represents the premium power plant of the new brand and should be of interest to many people who want to generate their own electricity. Accordingly, we were excited before testing the plant. How it performed and whether we can recommend it, you will learn in this article.
Scope of delivery: Almost everything included
The Solix RS40P mini PV system is delivered by freight forwarding, which is understandable in view of the enormous scope of delivery. Included is supposed to be everything that is needed for the construction and operation of the balcony power plant. Anker can almost keep this promise.
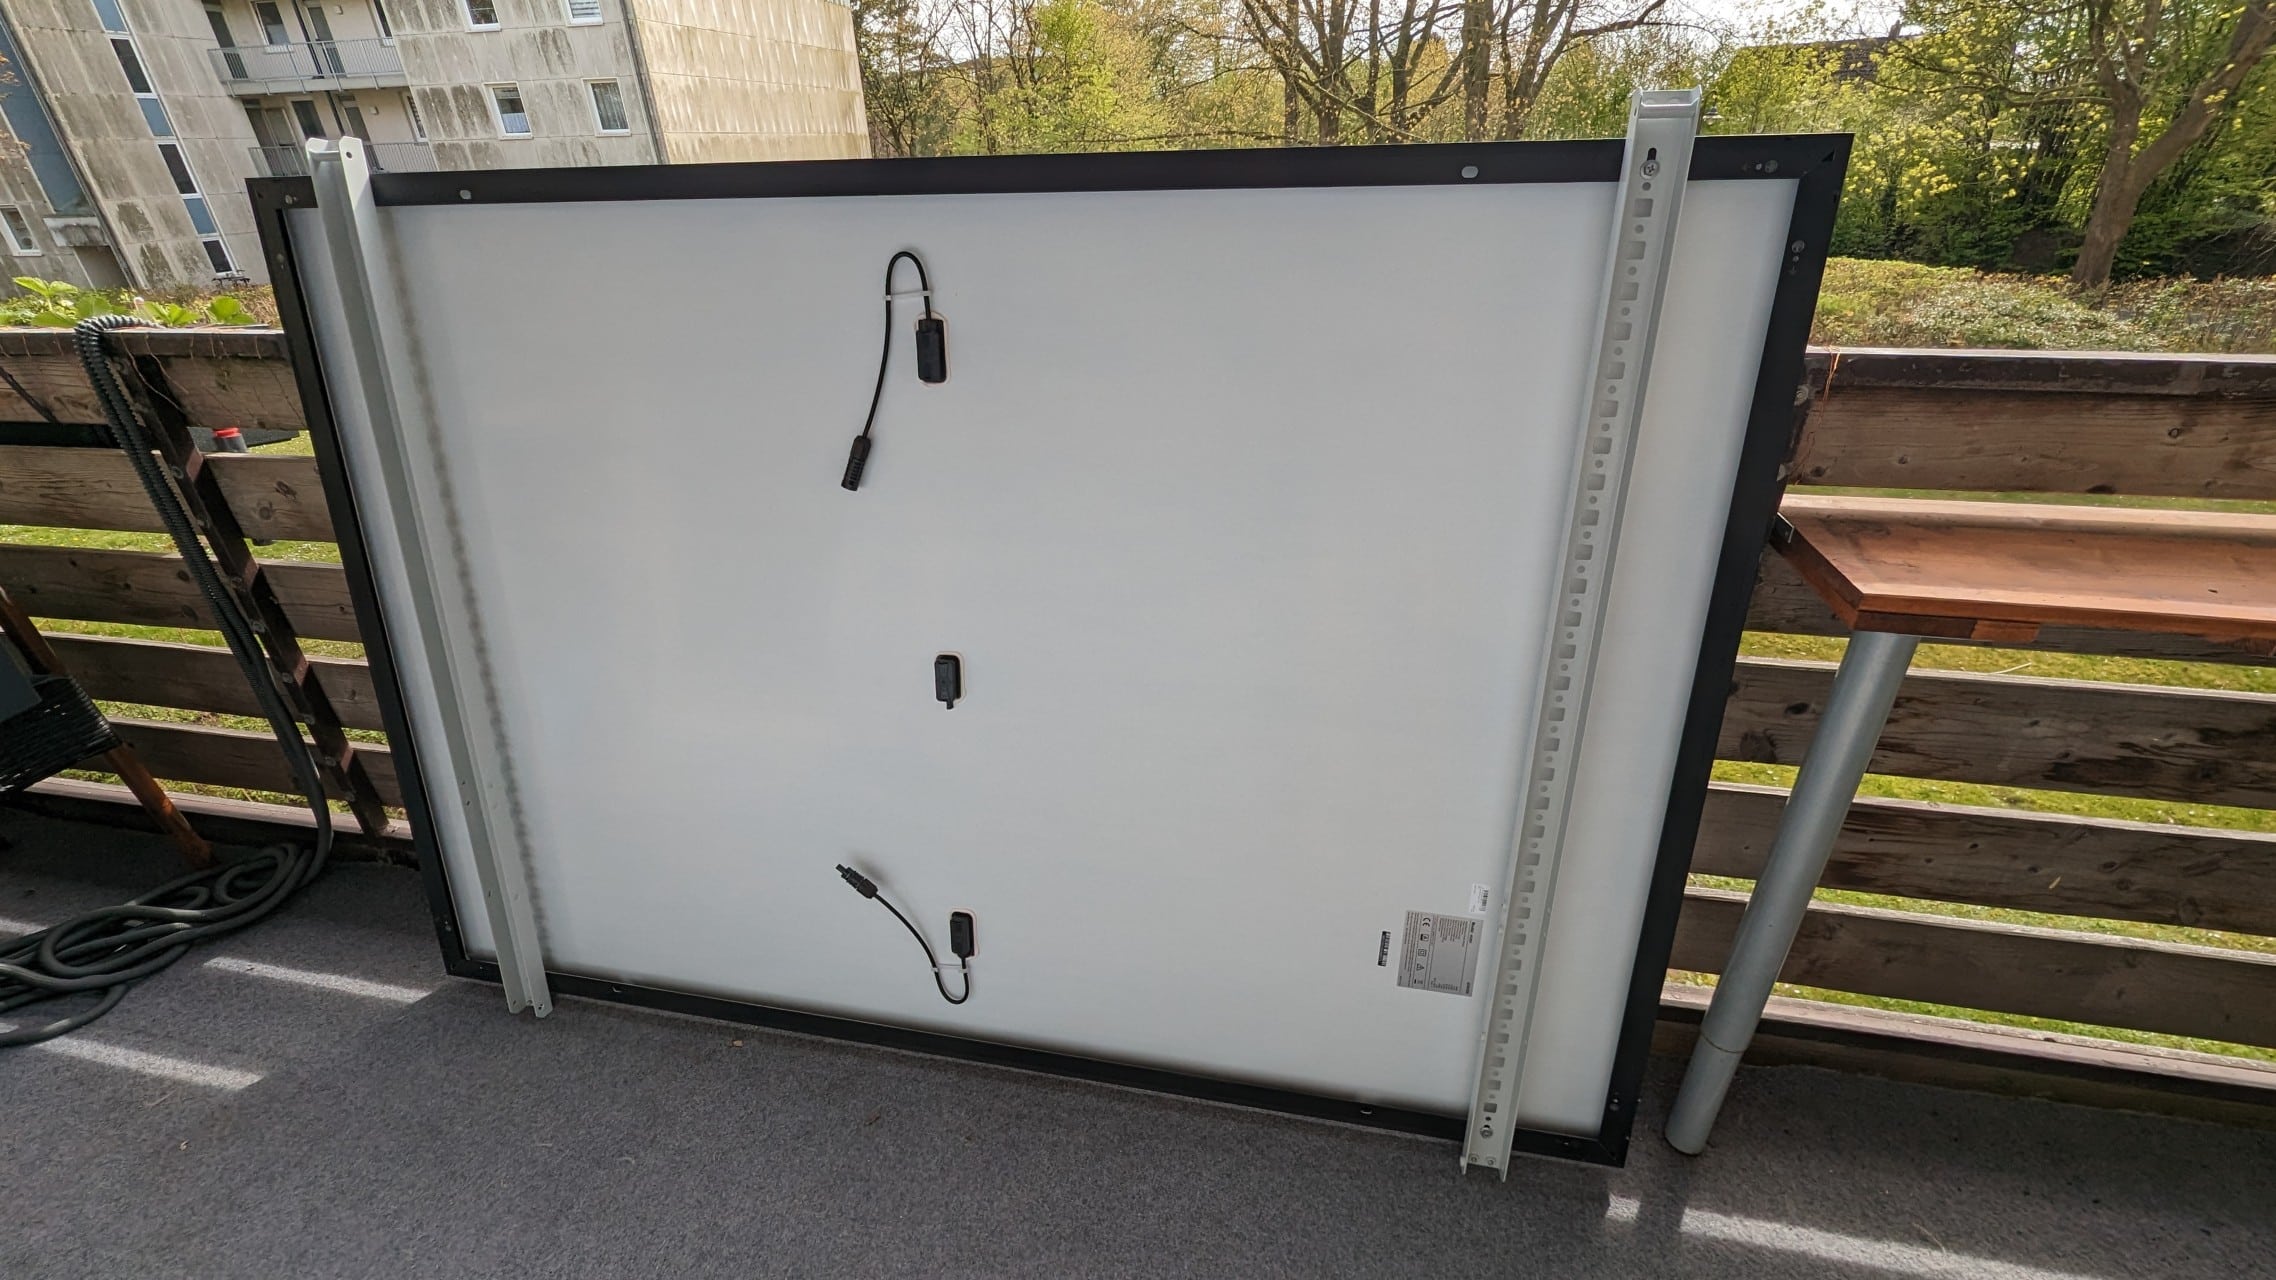
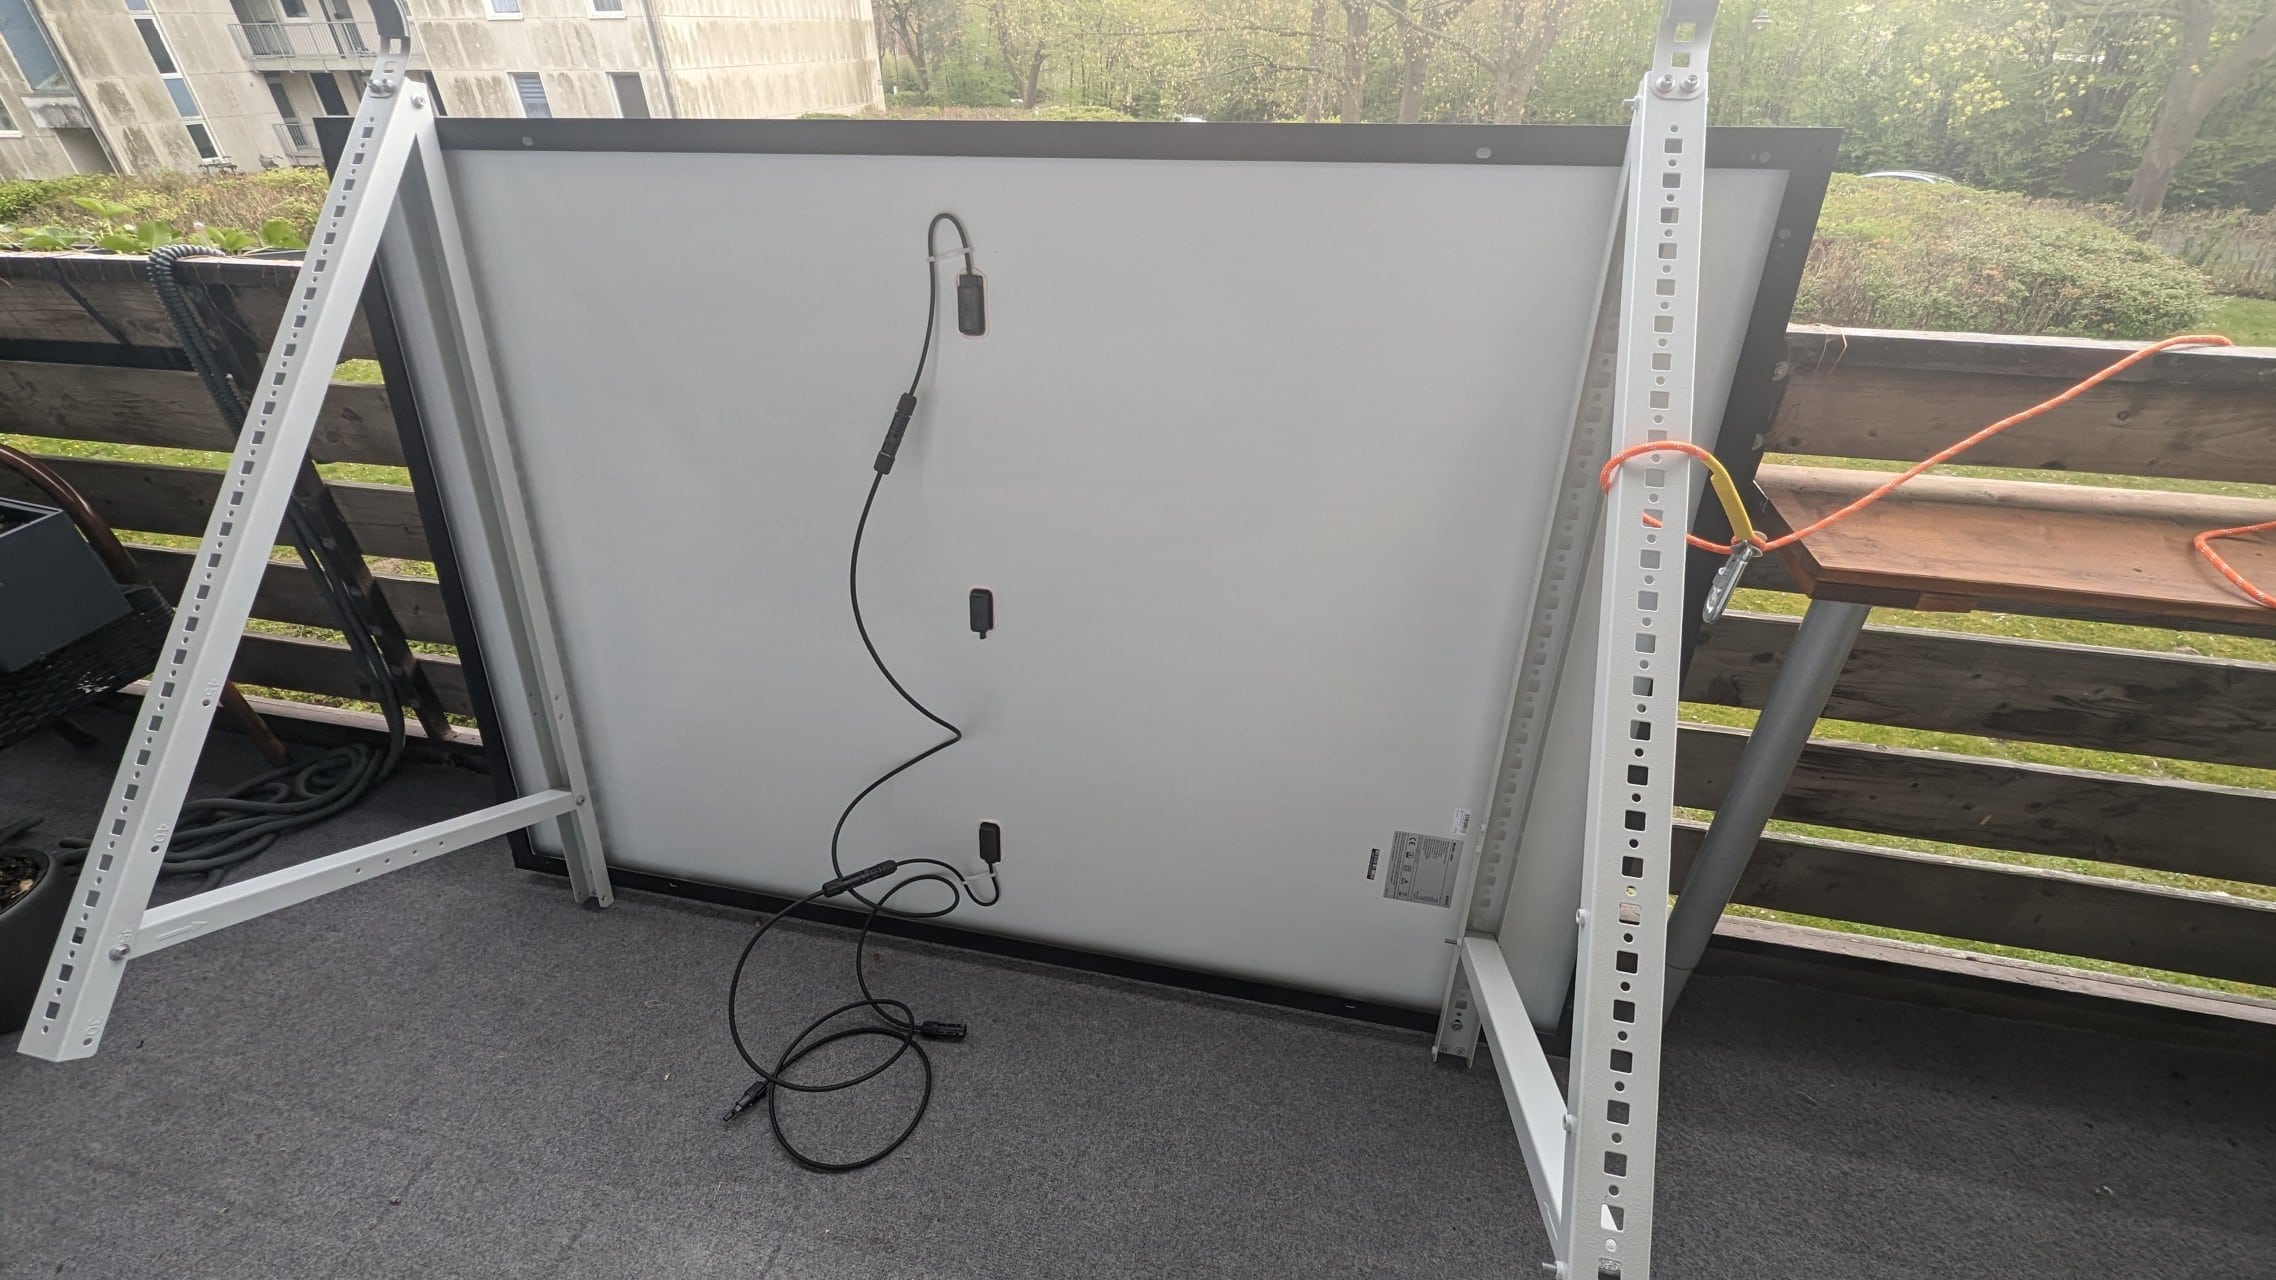
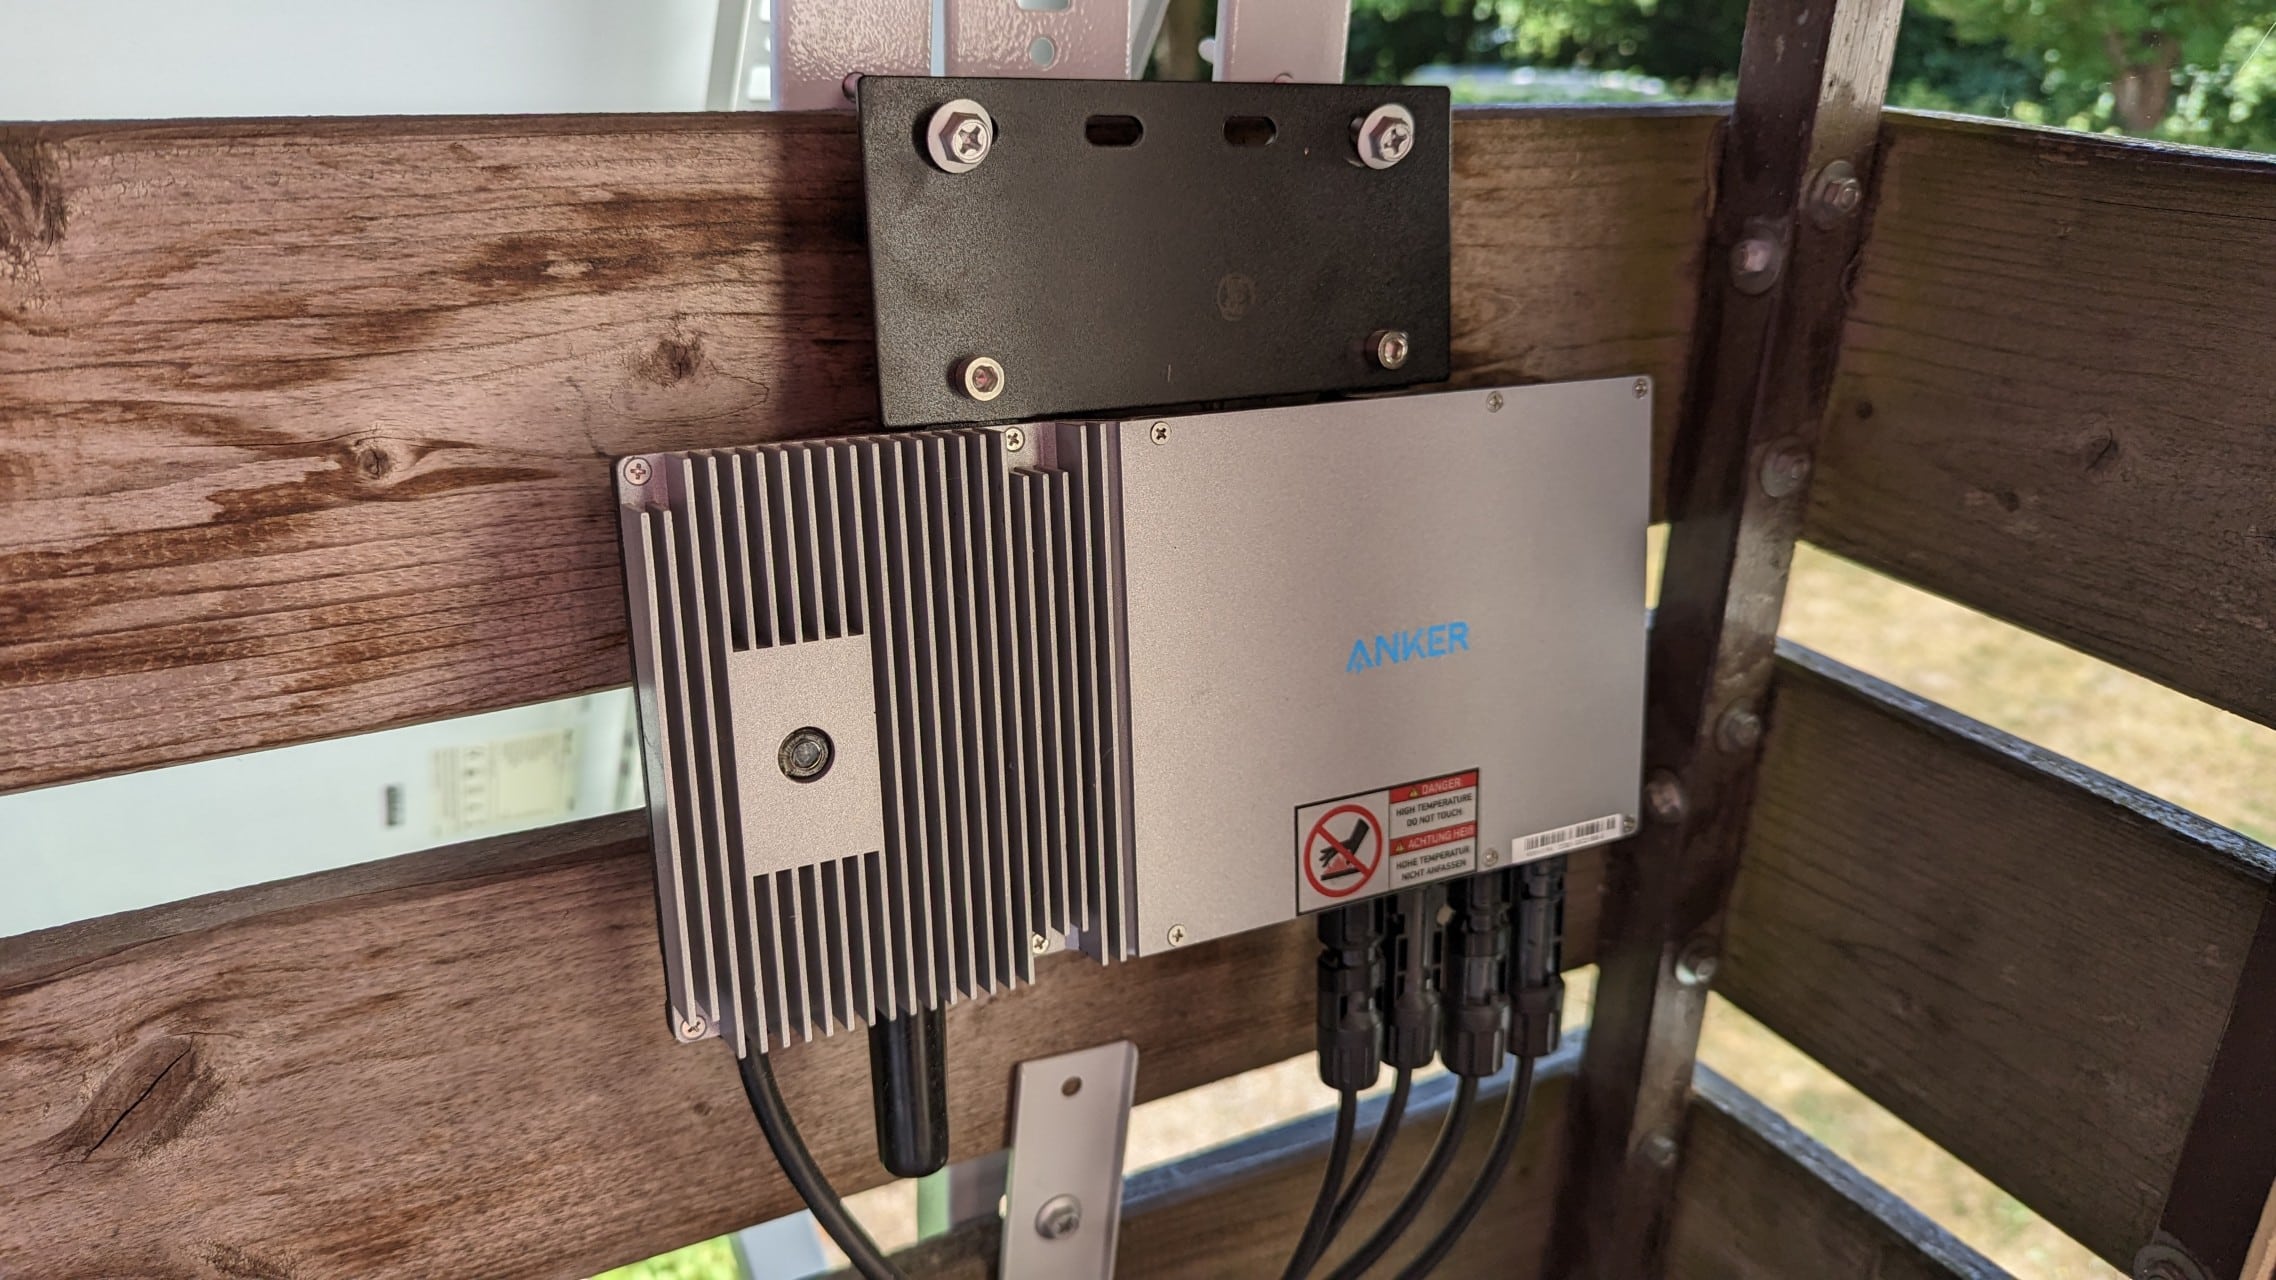
Among other things, we find an IP67-certified microinverter in our packages, which is designed for WLAN operation, takes a maximum input of 12A x 2 and is matched to the local power grid with an AC voltage of 230 volts. Also included are two premium solar panels, each rated at 440 watts. They measure 1706 x 1134 x 35 mm. In addition, there are brackets for mounting on the balcony, on a wall or on the ground. The brackets are made of steel and are adjustable at four angles (0, 30, 40 and 45 degrees). Also included are rails, hose clamps, metal clamps, bolts and nuts, foam bumpers to protect the balcony railing, a safety rope, a five-meter cable with Schuko plug, and a screwdriver.
Not included is a torque wrench, but it is needed if the system is to be installed according to the instruction manual. More on this will follow in the installation section. Despite the generous scope of delivery, this does not include everything needed for the setup.


Design and workmanship: unusually monochrome
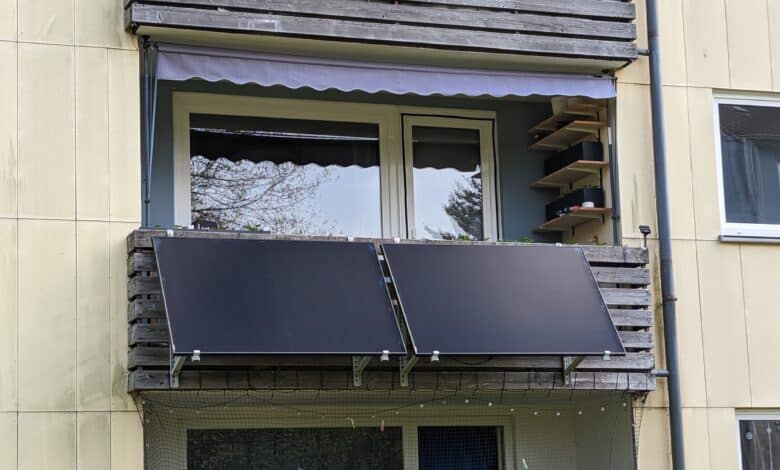
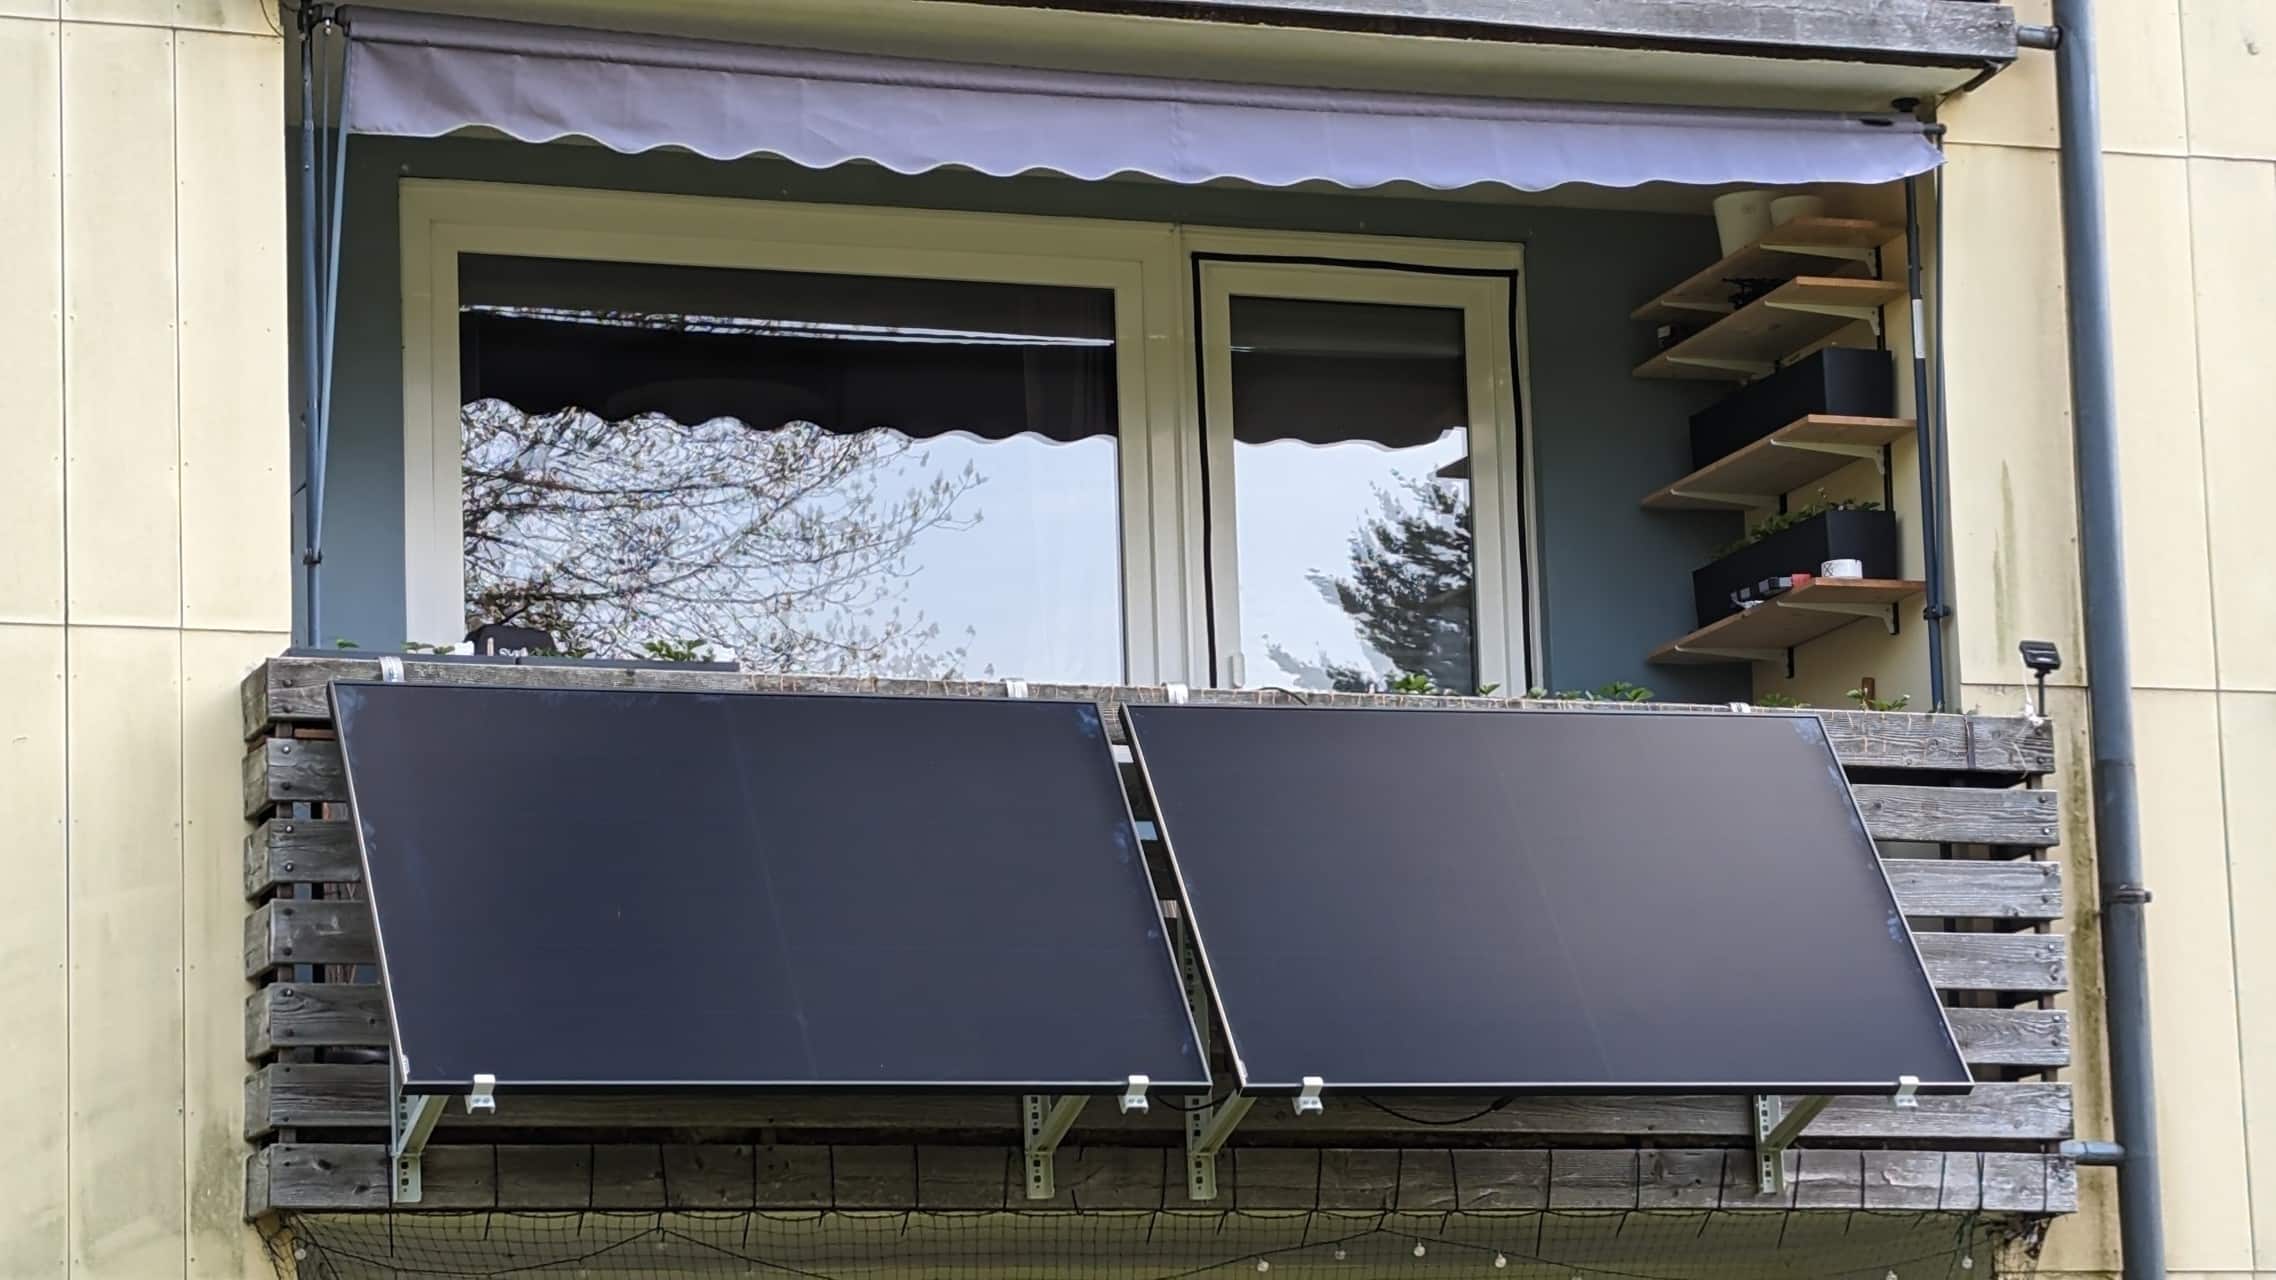
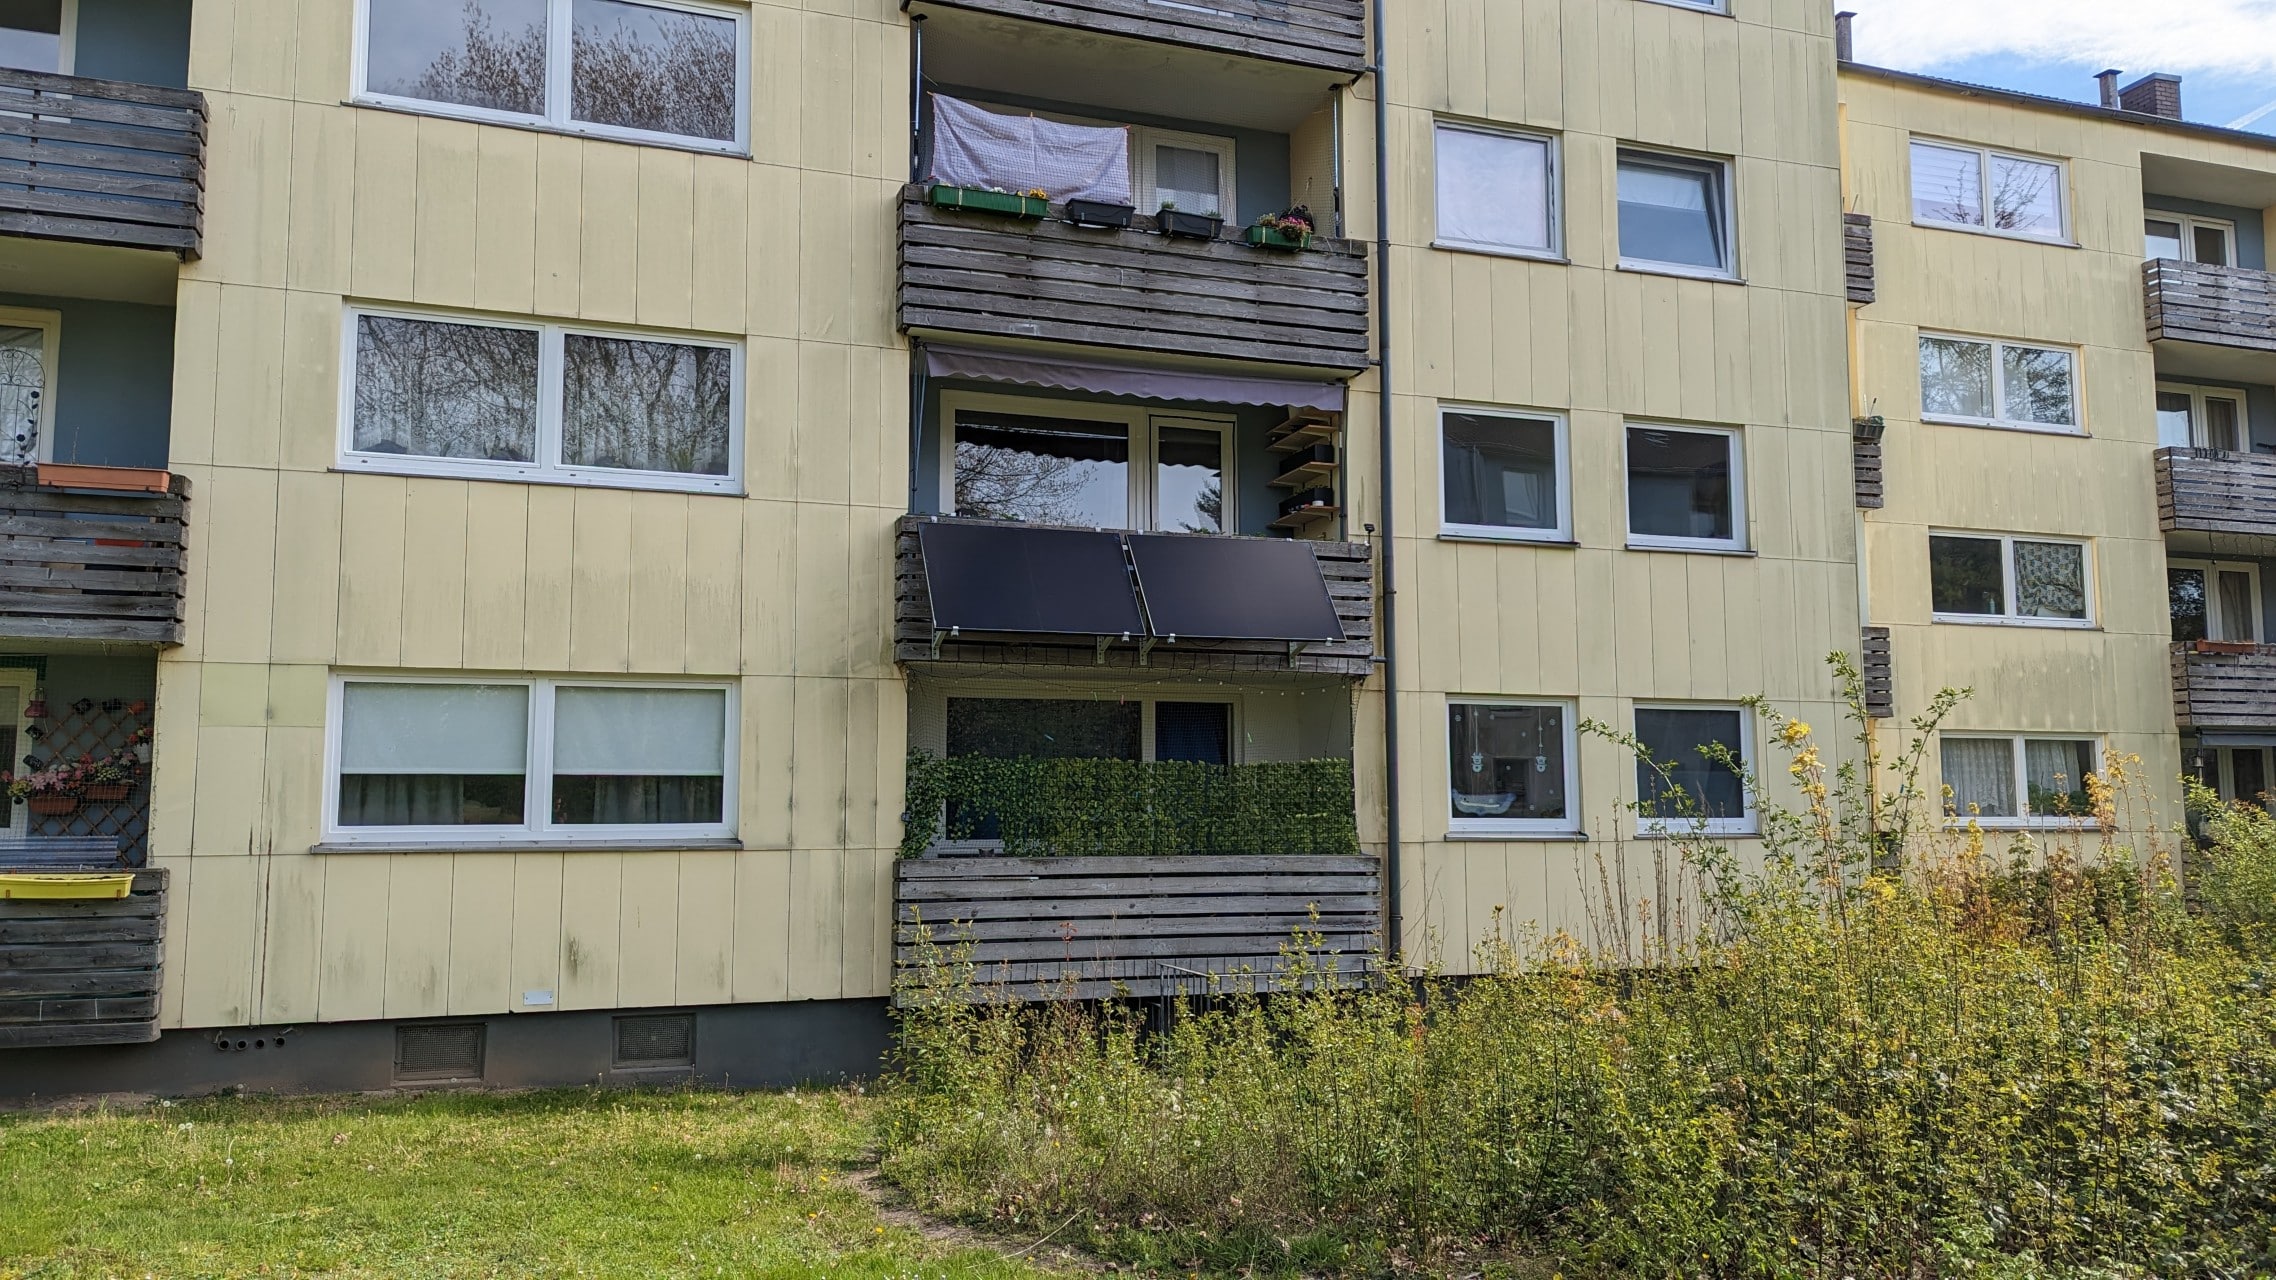
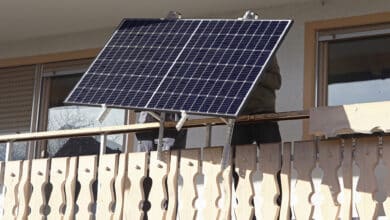
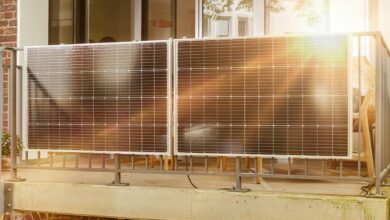
The design of the balcony power plant is relatively unusual due to one small detail – which is already noticeable when unpacking. For example, the solar panels lack the usual grid structure. Instead, it is a monochrome black panel. Otherwise, there is not much to say about the design of the Solix RS40P. Visually, it is a classic balcony power plant that is relatively large. As a reminder, a solar panel measures 1706 x 1134 x 35 mm.
The workmanship is of high quality. The brackets are made of steel, which inspires confidence. The rails that need to be attached to the panels also look sturdy and well-made. The mounting material for the balcony railing, on the other hand, looks a bit more unstable. This is not to say that it is inferior. However, there is a difference to the rails. Furthermore, the hose clamps are a bit short. However, the package comes with enough spare clamps, which makes it possible to screw two together and use them together.
The first impression of the Solix RS40P’s components is thus positive overall, although we were able to find a few minor points of criticism. More important than these dry runs, however, is the practical testing of the components: How easy is it to assemble the balcony power plant and how safe are the individual components in doing so?
Attaching the solar panels
Balcony power plants promise to be low-threshold usable. Unlike ordinary photovoltaic systems, they can be installed and put into operation without the help of professionals. However, that doesn’t mean installation is a walk in the park. Anyone who chooses the Solix RS40P will quickly realize this: The mounts, of which there are two in total, weigh ten kilograms each. In addition, there are 22 kg for the solar panel, which means a total of 30 kg that have to be hoisted over the railing. Without muscle power and without helpers, the balcony power plant fun ends here for the vast majority of people. However, this is not a negative unique selling point of the Anker power plant, but a circumstance that applies to any serious system. The solar panels are large and they have to be installed safely – after all, they would be extremely dangerous if they fell down. The equipment with fuses, brackets, rails, screws, etc. is correspondingly extensive. The fact that the brackets are made of solid steel is correspondingly positive against this background: They may be heavy, but they are stable and thus ensure safety.
In addition to at least one, or preferably two, assistants, a WLAN connection at the inverter’s location is a prerequisite for installing the system. Without a connection, commissioning is not possible – and the complex installation is therefore completely wasted.
Operating instructions clearly laid out and in German
Before starting with the assembly, we checked this requirement and took a look at the illustrated assembly instructions, which are also available in German. We found them to be clear and easy to understand – a definite plus. Then it was time to get started. We installed the solar panels horizontally. Alternative orientations are not possible. This also means that the panels are made to be installed on vertical lattice braces. If your balcony has horizontal braces, that’s a problem. It is also not possible to install on concrete balcony facades. It is important to consider these circumstances before purchasing the Solix RS40P. Otherwise, the balcony power plant could turn out to be a big and, above all, very expensive disappointment on the spot.
You should also consider the angle at which you want to mount the panels. As already mentioned, you can choose between 0, 30, 40 and 45 degrees. If you choose 0 degrees, you may gain visually, but you will have to accept a noticeably lower power generation.
Much effort and time required
The heavy support arms of the brackets must be bolted to the frame of the solar modules. End clamps are attached to the support arms themselves. Attaching them took effort, but was simple. Particularly difficult is the task of hoisting the solar panels over the edge of the balcony and then screwing them securely into place. At this point, we can only once again strongly recommend that three people tackle the installation! It should also be noted that during the assembly process there is a risk that parts of the balcony power plant may fall down. For safety reasons alone, therefore, no one should overreach themselves during assembly. It also makes sense to give advance warning to people living on the lower floors.
An all-around worry-free feeling?
The panel is held to the mount at the end by four screws. Here, Anker relies on self-retaining nuts, which provides additional security. The panel is bolted to the railing with two clamps at the top as well as metal clamps. However, it should be noted that this is not possible on every balcony without problems. In our test, we had to drill the metal clamps and fix them differently, because the railing did not allow the intended attachment. So a little creativity and craftsmanship is required here to achieve a secure construction. It is therefore not quite enough for an all-around worry-free feeling; nevertheless, we trust the mount and consider the fastening to be sufficiently secure. At this point, we can also once again refer to the assembly instructions, which guided us step by step through securing the system.
As mentioned earlier, the Solix RS40P does not come with a torque wrench. However, such a wrench is necessary for proper installation, as all screws should be tightened to a torque of 5 Nm. We recommend adhering to this specification in any case! This is also a safety-relevant detail, which is of enormous importance, especially due to the lack of further protection – apart from the safety rope. A torque wrench must therefore be procured by the user.
According to the instructions, the inverter should be attached to the balcony railing with the hose clamps. Unfortunately, this was not possible for us, because we did not have enough hose clamps left, since we always had to connect two for the solar panels. Unfortunately, we also noticed too late that you could have screwed the inverter to the bracket, below the solar panels. Unfortunately, this is not mentioned in the instructions.
However, we also have to emphasize that not much technical know-how is necessary. The assembly is simple overall, but takes time and strength due to the many parts and the enormous weight. In total, it took us about three hours to attach the system.
Take off during thunderstorms?
We were puzzled by the recommendation to dismantle the balcony power plant during severe thunderstorms, hailstorms and high winds. Anker does say that the system can withstand normal weather conditions. However, in the case of the exceptions described, there is a risk of damage. Due to the great effort involved in assembly, we have great doubts about the practicality of this recommendation – after all, disassembly and reassembly are also likely to take time and require assistance. Spontaneous disassembly should thus hardly be manageable.
Connection with inverter and commissioning
Once the device is hanging, it is time for commissioning. To do this, the solar modules are connected to the inverter via an MC4 extension cable, which is included in the package. However, this only works when there is sufficient sunlight – otherwise, due to lack of energy, it will not go on. When the inverter starts flashing red, it is ready for operation. This worked well for us.
However, the fact that it is ready for operation does not mean that we can start. Now the Anker app has to be downloaded. A smartphone or tablet is therefore a necessary prerequisite for using the Solix RS40P. Once the app is downloaded, an account must be created. After that, the inverter can be connected to the app. To do this, search for the MI60 inverter via “Add device”. Once the connection has been established, the smartphone must be connected to the inverter’s WLAN (“MI- XXXXXXX”). The default password that is asked for is 12345678. If everything is successful, the LED on the inverter will light up green from now on and the app will prompt you to connect the inverter to the power grid.
For us, this setup worked surprisingly without complications. The only drawback is that anyone who does not have an up-to-date smartphone or tablet cannot use the Solix RS40P balcony power plant. We found out later that other problems arise from the app constraint – more about that in the compatibility section.
Data retrieval in the app dashboard
However, the balcony power plant Solix RS40P from Anker that we tested can score points not only with the smooth startup, but also with everything that follows. The Anker app turned out to be extremely transparent and useful in our test. We can access all sorts of interesting information about our balcony power plant in a data dashboard. For example, we can see how much electricity we have already been able to generate, how much CO2 has been saved as a result, and how much money we have saved. All in all, the app provides information about how successful the use of the power plant has been. We noticed that the data is not provided in real time, but with a slight delay. However, we did not experience this as negative at all.
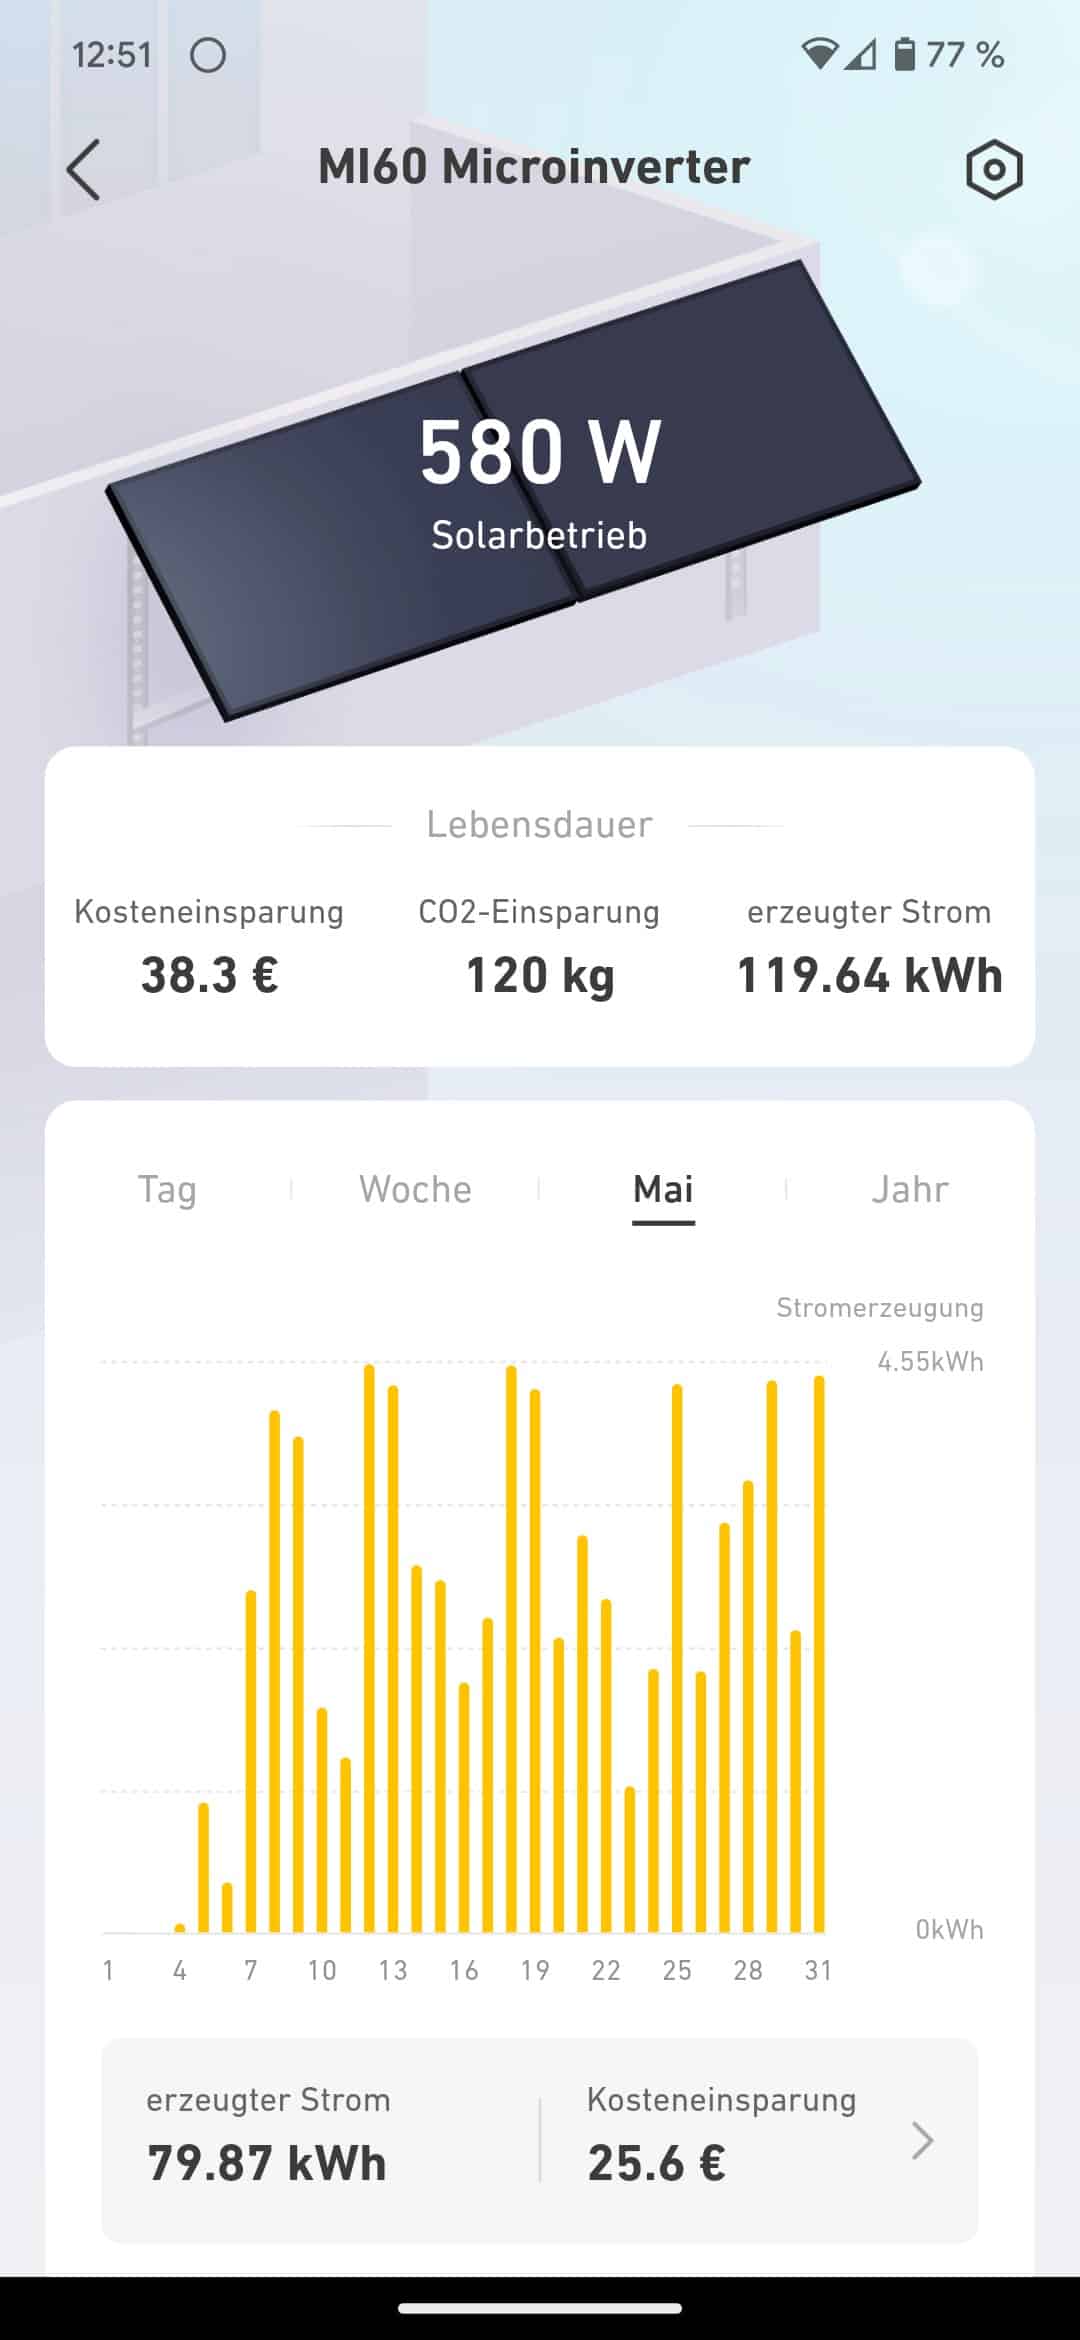
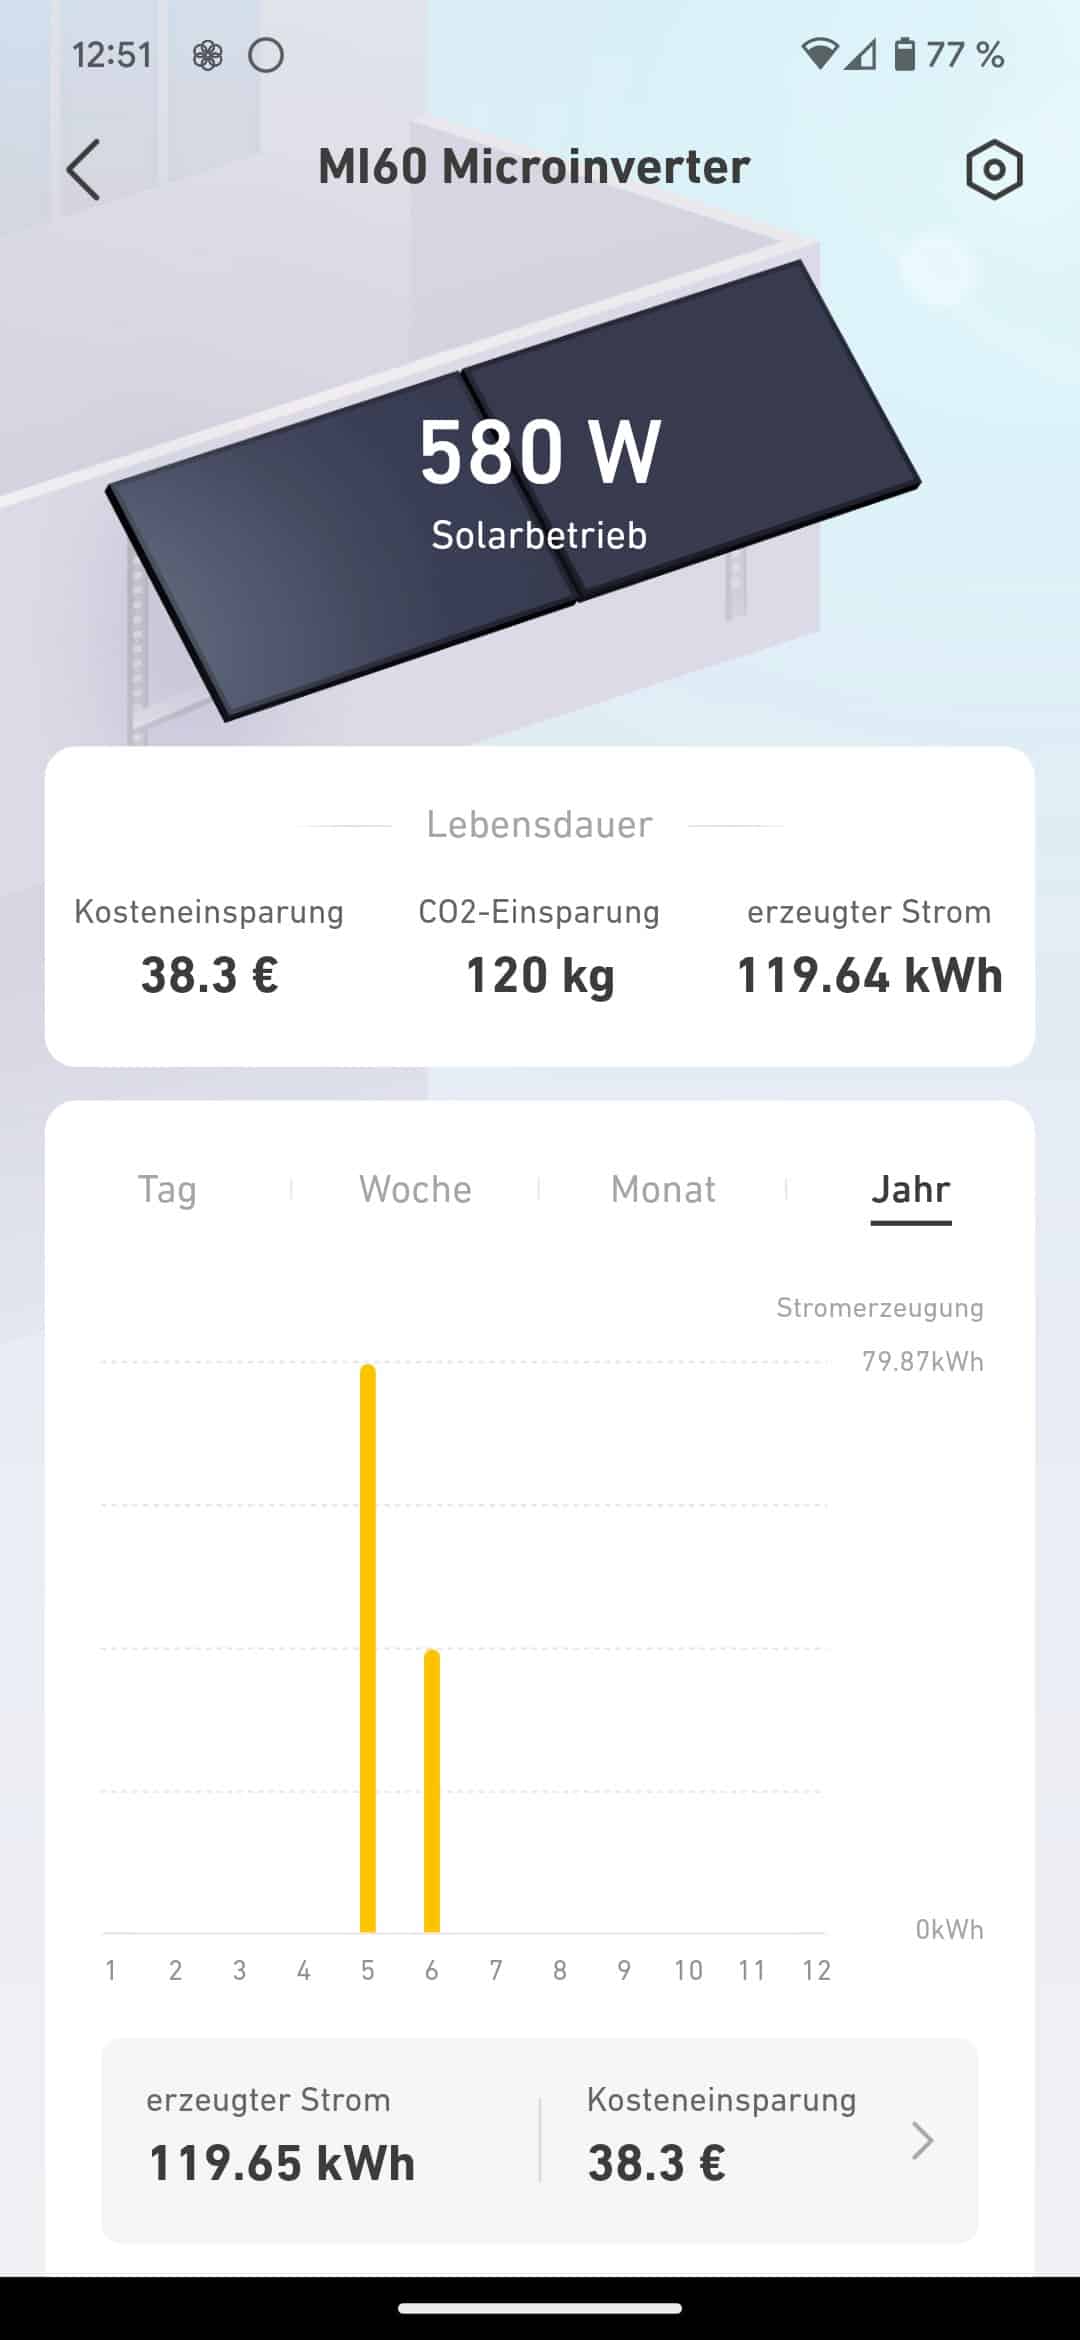
We tested our power plant from Anker starting on May 4. Throughout May, we were able to generate 79.87 kWh of electricity, saving 25.60 euros according to the app. When used over all 31 days – assuming similar weather conditions – that equates to a monthly savings of around 29.39 euros. That sounds very tidy, but it would also mean that it would take more than 46 months for the purchase costs to be offset by electricity cost savings. It should also be noted that the balcony power plant is almost useless in the dark winter – in July or August, on the other hand, the savings should once again be noticeably higher than those of the corn. We should also save more overall in June: Already on June 10, we have reached half of the total corn power production.
However, it should also be noted that most probably do not have a 600 watt base load, which means that more is fed in during the day than is consumed. So the stated savings are unlikely to be achieved by most.
The solar panels individually achieved about 380 watts in our test, so for an 800 watt inverter you might even consider a third solar panel.
Compatibility with other electrical devices
However, the Anker app has one major drawback: an alternative is not provided. This not only means that it is mandatory to have a current smartphone or tablet; it also prevents compatibility with other devices. For example, it is not possible to access the data or the interface to the inverter via a third-party app or even an ordinary web browser. This ultimately means that integration into a smart home network is not possible. This, in turn, is likely to be a significant disadvantage for some interested parties, as potential for interconnection and savings is lost in this way. For example, it is not possible to switch other devices on and off depending on the power generation. In addition, it is not possible to access all relevant data in a single place in the smart home due to the necessity of the Anker app. Everything concerning the Solix RS40P has to be looked up separately via the app.
Summary of the Solix RS40P: Solid premium power plant
Overall, the balcony power plant Solix RS40P from Anker scores positively in our test! Except for a torque wrench, all parts and tools necessary for assembly were included, the build quality is largely high, and the assembly instructions are clearly laid out and easy to understand. With the instructions, we managed to install the balcony power plant without any problems. However, several hours and a total of three workers should be planned for this. In operation, the Solix RS40P also convinced us: In just under a month, it generated 79.87 kWh of electricity, saving us 25.60 euros in electricity costs. In June, the situation looks even better due to the weather.
However, our impression of Anker’s premium balcony power plant is not unclouded. We were negatively struck by the lack of compatibility with other devices, the practical impossibility of spontaneously dismantling the balcony power plant as recommended in the event of a violent thunderstorm, hailstorm or strong wind, and the high price. Offered for 1,390 euros, the Solix RS40P is one of the more expensive models on the market. However, Anker also offers a slightly less powerful variant, the Solix RS40, for 990 Euros. However, we did not test this model.
In conclusion, we can make a recommendation for the tested mini PV system. Anyone looking for a really powerful and large balcony power plant that can contribute significantly to reducing electricity costs and save CO2 should be happy with the plant!

Anker Solix RS40P
Design & workmanship
Assembly
Performance
Value for money
90/100
The Solix RS40P balcony power plant is extremely powerful and easy to install. Only the effort required and the price stand out negatively.
No replies yet
Neue Antworten laden...
Gehört zum Inventar
Beteilige dich an der Diskussion in der Basic Tutorials Community →